Weekly Update #4

Old guy in a tuque hiking in the forest

Four weeks in a row. This may be a record.

Some more hiking, a bunch of treadmill time, and new toys.

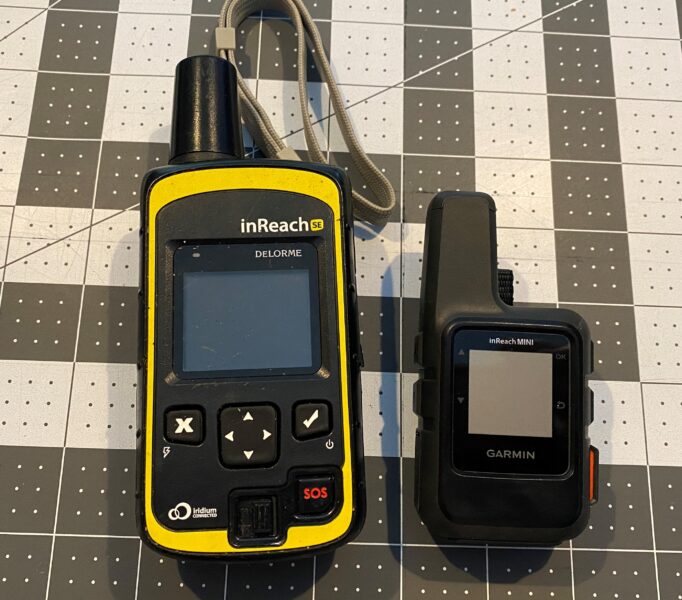
I bought some new lighter-weight goodies this week. I replaced my old DeLorme InReach SE with a newer Garmin InReach Mini, which cut the weight in half, from about 200g to 103g. I am hoping that the newer one is a little more reliable than the old one was. I was somewhat disappointed that the old one was quite finicky about its view of the sky – sometimes it just did not want to send, even with a good portion of the sky in view.

InReach SE and InReach Mini side by side comparison
Old InReach (197g) beside the InReach Mini (103g)

I also bought a new, lighter charging block for charging up my Anker 20000 mAH power bank. The 511 nano is a 20W USB C charger that weighs only 31g. It will charge the power bank fully in 10 hours, so great for a motel stay while on the PCT. Top-ups now and then will keep me going in between.

I ordered a new headlamp, the Petzl Bindi. Only 35g (compared to my BD Spot at about 85g) and has a rechargeable built-in battery, so I don’t have to keep spare AAAs on hand. Helpful on trail, when I’ll always have the power bank along.

Finally, I’d been thinking about trying out new shoes. I’ve been wearing Merrell Moab shoes in the Wide variety for many years now, and they work great for me. I can always rely on the fit, and they take no breaking in whatsoever – I can buy a new pair and take them on a 10 hour hike with no foot issues at all. The downside is that they are very heavy shoes – about 1 kg for the pair.

I have heard a lot about the Altra Lone Peak trail running shoe, and how the footbox is very wide. Knowing that I have a very wide foot, I was hoping that the shoes would fit me well. I went to Mountain Equipment Co-op, and tried on a pair. They felt so good on my feet, without having to size-up for the width, that I bought a pair immediately. Worth a try!

I used the shoes on the treadmill, initially, doing 90 minutes at 3 mph (stupid imperial treadmill) at a six to twelve percent grade. The shoes felt great, so I’ve tried them out on some trails, walking the dog, for an hour at a time, twice now. Today, I finally spent the whole day in them, at work. So far, so good! We’ll see how they hold up for some more serious hiking in coming weeks.

Anyway, the weekly totals are down a bit from last week, but I’m still pretty happy overall. The best thing is that the work is showing real benefits in my resting heart rate. January through March, my resting rate averaged 52 -53, and so far in April (as of the 17th) it is averaging just under 50. Much better, and more like it should be!

Stats for 10 April – 16 April, 2022

  • Steps: 114261 (avg 16323) down 5% from last week
  • Floors: 478 (avg 68) up 26% from last week
  • Calories burned: 23610 (avg 3373) down 2% from last week
  • Average resting heart rate: 49.7 (down from 50.1 the week before)

The Big Three – Part 3 – The Sweaty Brow Down Quilt

So, I learned that the “Big Three” are the quickest and easiest way to slim down the load that you lug around on your back while backpacking. I went to a much lighter, slimmer pack. And I made my own lightweight tent. Time to think about my sleep system.

Why down?

I decided to start with a down quilt, because that is the lightest option available. Living near and backpacking in the mountains of British Columbia, however, means that moisture is frequently part of the equation.  What that means, is that this will not be my only quilt.

Down is great when it stays dry, and can keep its loft. A few days (or even hours) in a rainy environment can quickly negate any benefits of using down. You end up with a bag of what feels like damp oatmeal, with zero warmth whatsoever.

Nonetheless! A down quilt is light, warm, and awesome, if you can keep it dry.  And backpacking in the summer in BC often provides long stretches of dry, sunny weather!

Why a quilt?

A quilt is a very efficient way to stay warm. When using a sleeping bag, the insulation that is under your body doesn’t actually do anything to keep you warm. Once it is flattened by body weight, there is little insulating value at all, so it is pretty much wasted weight. What is more important is the insulating value of the pad or mat that is used. (More about that later…)

As long as a sufficiently warm pad is used, you really just need enough material to cover your body, and tuck close enough to prevent drafts.

The hood on mummy bags also include a lot of wasted material. Other than in extreme conditions (winter mountaineering, say) it is more efficient to cover yourself to the neck with a quilt, and then put a warm layer on your head. A tuque is usually sufficient, but in very cold conditions, I take along a home made down hood, which I made for use with my quilt. It weighs about 30 grams, and keeps head and neck toasty warm!

Outer fabric for the Sweaty Brow down quilt. The fabric is .9 ounce per square yard, 15 denier poly taffeta in Burnt Orange.

Where did the design come from?

I did a bit of looking around on the interweb, and cobbled together ideas from a couple of different places.  The most important is from the same guy I based my tent on – he goes by “dubber” on YouTube. Here is a link to his down quilt construction video.  Another useful source was Joe, at Backcountry Banter, who had less of the “nitty gritty” than dubber, but good design thoughts.

I ended up making a Karo Step quilt, which has partially open baffling, permitting the down to be shifted when required, and greatly simplifying the stuffing process. All the down gets placed in at once, and spread throughout, rather than having to measure out the down, and place it into different chambers.

Transfer of down from the bag it came in, into the completed quilt shell. Transfer took place in my shower. It was a messy process…

The fabric all came from Ripstop by the Roll, and the down from DownLinens.com. Both have been great to purchase from!

What is the quilt like?

I’m not going to go into full details about the making of the quilt, or the materials, but here are some highlights:

  • The fill is one pound (454g) 850 FP grey, water resistant treated down.
  • Total weight is 540 grams.
  • Length: 66″ (168 cm)  Width: 49″ (124 cm) tapering to 34″ ( 86 cm) at the feet.
  • I made a velcro-in down footbox panel, which can be taken along if it will be cold.
  • The tapered leg section has snaps to wrap the legs.
  • The top has an elastic cinch and a snap buckle to click behind the neck and tighten.
  • The sides have two additional buckles to join onto adjustable straps on the sleeping pad, allowing the user to hold the sides down and cinch them in close, preventing drafts.

The completed down quilt, laying on the front deck. You can get an idea of the simplicity of the baffle layout. Version two will likely have smaller chambers and more baffle material to prevent down movement…

My thoughts:

I have been comfortable under the quilt down to temperatures just below freezing, while wearing long underwear, top and bottom, and my down hood. I’m not sure how much lower I can take it than that, because I am kind of a cold sleeper – I get cold easily, and it can really disturb my sleep if any part of me is chilly.

The only issue I have had with the quilt is that the openings in the baffles seem to be a little bit too big. That is, the down moves just a little bit too easily between the chambers. I move around a fair bit in the night, and the down shifts downward, following gravity and puffing out the edges of the quilt that are laying on either side of me.  It takes a while, but once or twice during the night, I find that I have to smack the quilt around a little, to spread the down evenly over the top of my body.

Unfortunately, it is very difficult to change this, once the quilt is complete. It would require removing all the down, and re-opening the seams, then sewing in short sections of baffle material into the gaps. I will think about whether I want to take such an extreme step.

In the meantime, the quilt is super lightweight, and very comfortable – with just a little care-taking during the night – at temperatures around and above freezing.  It is great for summer trips, and shoulder season trips at lower elevations.

The Big Three – Part 2 – The Sweaty Brow UL Tent

Front and back doors closed, set up on the lawn

While doing research on lightweight camping equipment, everything kept coming back to “The Big Three”. Pack, shelter, and “sleep system” (used to be sleeping bag!).  The first thing I replaced was my pack. Next on the list was my shelter.

In the past, I have had (and I still have!) a whole bunch of tents, ranging from a “Unishelter” bivy, to a 10-person Coleman job – the Tent Mahal.

The Integral Designs Unishelter in Paria Canyon, Utah.

For solo trips, or with my dog, I have recently used a single person, cheap tent from Alps Mountaineering – the Zephyr 1. I got it on SteepAndCheap.com a few years back, for about $80 USD. It weighs in at only 1625g, or a little over 3.5 pounds (body, fly, and poles). It’s pretty small, but both the dog and I fit inside. There is very little vestibule space.

Zephyr 1 (and Chester) in Squamish

If I feel I need a little more space, I have my MEC Tarn 3 tent. Like the Zephyr, it is a double wall mountaineering style tent, and weighs in at about 3100g – close to seven pounds. Great for spreading out, and for hiding all my gear in when I wander off for the day…  And a really nice sized tent for two, despite the weight.

Tarn 3 tent on the West Coast Trail

In the past, I have also used a simple sil-nylon tarp, supported by a pair of trekking poles. It is light-weight, but I wasn’t a fan of the open ends, or of the lack of protection from bugs.

Tarp shelter in Grand Gulch, Utah, 2008

I looked at some ultralight options from the smaller manufacturers, but the prices pretty much took my breath away.  So I looked for options… I have a sewing machine, and I know how to use it, so why not? I found this video on YouTube, and was incredibly impressed. It is fully enclosed with mesh, has a full bathtub floor, and doors front and back. It is not free-standing, and requires a pair of trekking poles to pitch. Which is OK, because as I get older I find I like using poles more and more…

I ordered a bunch of material and bits from good old Ripstop By The Roll, and went to work.  It is not perfect, but here it is:

Front and back doors open, set up on the front lawn

Front and back doors closed, set up on the lawn

I have used this tent for about fifteen nights, or so, and am pleased with it so far. It weighs about 1050g, plus stakes and poles (carbon fiber trekking poles, 465g) and has a lot more interior space and vestibule space than the Zephyr. I used it on top of Capilano Mountain last fall, where the winds went wild overnight, and it held up just fine.  There will be a Version 2.0 eventually, but for now this is working well!

My Sweaty Brow tent, atop Capilano Mountain at sunset
My Sweaty Brow tent, atop Capilano Mountain at sunset. My home-made down quilt is also visible inside.


The Big Three – Part 1 – The Pack

For a number of years, I had been using a big, old, heavy backpack from Vancouver’s Taiga Works, which I had purchased in the mid 1990s. It was about 75l, and weighed pretty close to a tonne – at least, it seemed that way… I’ve used it in Utah, backpacking the Paria Canyon, and Grand Gulch. I’ve used it on a bunch of trips around Southwest BC, and I’ve used it on the West Coast Trail.  In fact, if I need to take everything including the kitchen sink, I still carry it.  If I need big capacity, no matter the weight (i.e. no long, high days) it is a great workhorse.

Big ol' Taiga pack in Buckskin Gulch
Big ol’ Taiga pack in Buckskin Gulch

A few years ago, I bought an Arc’teryx Bora 50 (discontinued, discounted, from MEC) and it is a really nice pack when you don’t need to carry as much. It is a few pounds less than my Taiga, is very comfortable, and has some great features – but it’s still no lightweight.

My son with the Arc'teryx Bora 50 on the West Coast Trail
My son with the Arc’teryx Bora 50 on the West Coast Trail

At about the time I was starting to get into the idea of hiking the John Muir Trail, I decided to upgrade to a nice new pack. However, I had not yet converted to the “less is more” school of thought.  I wanted a modern, large, not necessarily light pack.  I went to MEC and picked up a Forge 65l pack. Before I even used it, I started learning about the truly “ultralight” options out there…

I did a little research, and settled on the Zpacks Arc Haul, a backpack with a carrying capacity of about 40 pounds, holding about 60l (including all external pockets), and weighing in at only 680g (24 ounces)! Granted, it was a lot more expensive than the MEC pack, but I was sold. I returned the Forge 65 to MEC.

I have now carried the Arc Haul on a few overnight trips (up to five nights in length) as well as some day trips (at that weight, it is perfectly reasonable as a day pack, and incredibly comfortable!) and I just love the thing. The suspension and hip belt fit like a glove, and it carries everything I need for a solo, multi-day trip (if I am careful about what I’m taking).

I also purchased a hip belt pouch for the pack, from Zpacks. I then bought some material from Ripstop By The Roll and made a matching one for the other side, for less than half the price. I have also made a pouch for one of the shoulder straps, as well.

Unfortunately, I don’t have any photos of me wearing it, other than the straps visible on my shoulders! Here is a link to a good shot of the pack from the Zpacks website. And here is a photo of it atop Mount Harvey, with Howe Sound below.  Hey, it’s all I’ve got!

The Zpacks Arc Haul backpack, resting quietly in its natural environment.